Say Hello!

Have a question about a product?

Looking for a special or custom order?

Interested in collaborating?

Drop a line!


123 Street Avenue, City Town, 99999

(123) 555-6789

email@address.com


You can set your address, phone number, email and site description in the settings tab.
Link to read me page with more information.

The Dye-aries

Heart of the Madder

Sophie Kanter

Madder is a dye plant whose roots are harvested to create a range of brilliant reds and subtle corals. It is thought to be one of the oldest dye plants that have been used to color cloth. Let’s explore!

The madder plant has green, leafy shoots that grow above the ground and brilliant red roots.

The roots can be used fresh or dried to create a dye bath, and can also be ground into powder to achieve color on cloth. Below is a picture of the beautiful gradient of colors that can be created using madder root.

Image via Catherine Ellis

Archaeological evidence suggests that madder is one of the oldest dye plants to be used practically to color cloth because of fragments of fabric found in the Indus Valley that date back to 3000 BC. That’s a long time ago!! Similar madder-dyed fragments have been found in ancient China. Clearly the madder plant was growing across the globe and was used by several different civilizations in the same applications.

Although we know the madder dye was used, we can’t know exactly what it was meant to symbolize. Throughout history, various plants and their resulting colors have been used to mark territory via clothing or to represent oneself as part of a certain tribe. Perhaps people in these ancient civilizations were using madder-dyed red colors to do the same—to bestow some quality to the wearer, or even to make the clothing sacred.

Above is a microscopic view of a madder-dyed textile found in Israel approximately 3,000 years ago. How cool is that! It is rare to discover ancient pieces of fabric as old as this one because fabric decomposes quickly (comparatively, at least, to things like pottery and metals).

History has seen many incarnations of madder-dyed textiles and the color’s significance, including the robes of Italian cardinals in the 16th century and the (in)famous Red Coat soldiers. In some cultures, it was seen as good fortune for the bride to wear a red dress on her wedding day. Overall, red was seen as the color of royalty or those with high social status.

The Red Coats are probably the most recognizable example of madder-dyed clothing. They wore wool coats that were dyed bright red so that they could stand out on the battlefield.

Whatever side of history you may have been on at the time of the American Revolution, it can be said that the costume choice for the soldiers on the British side was a clever one. In the thick of battle, the air would be heavy with smoke, which would make it almost impossible to see anything, let alone tell the difference between one’s friend and one’s enemy. The literal red coats of their uniform would stand out in stark difference to the white or gray smoky atmosphere. The soldiers could identify those on their side and, to put it plainly, not shoot them. On the other hand, it seems the color would have made them stand out as targets for their enemies as well.

But whatever the case was, the fact of the matter is that there is a long and rich tradition of dyeing with madder, going back to the ancient world. As societies evolved and there was a need for the dyeing of clothing to a) make things beautiful or fashionable, and b) to signify social status or hierarchy. At the time, the only option that people had was to turn to the natural world. The practice of natural dyeing has a much-developed history, so people put that knowledge to practice to make their clothing special in some way.
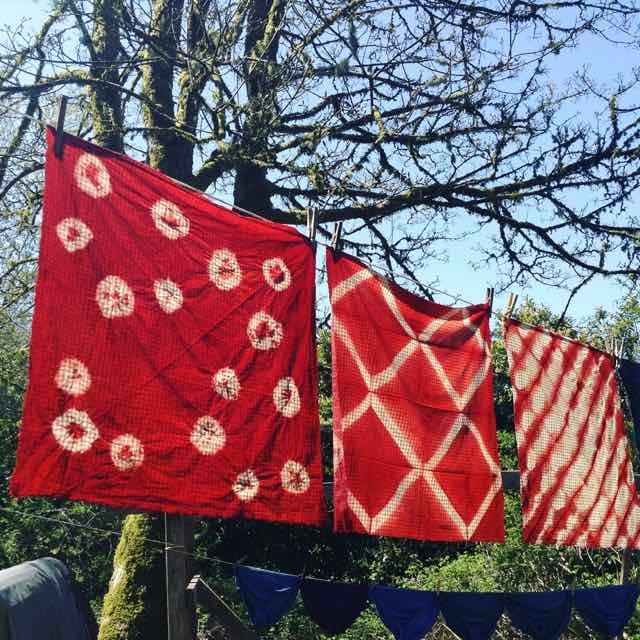
When considering your next dye project, perhaps it’s time to dip your hands into madder!

Notes:

In order to use madder in a way that creates long-lasting color on cloth, you’ll need to mordant the cloth before dyeing. See a tutorial here.

I buy my madder root from Botanical Colors.

I have also found that Manjistha Powder can also be used. Common madder dye comes from the plant rubia tinctorum; Manjistha comes from rubia cordifolia. The former is known as “Dyer’s madder,” while the latter is referred to an “Indian madder,” meaning it comes specifically from the country of India. Apparently it has some holistic health benefits, which I have not explored, but it works perfectly for dyeing cloth. The color is almost indistinguishable from colors you’d get from “common” madder.

Happy dyeing!

An Introduction to Flower Pounding

Sophie Kanter

Flower pounding, or Hapa Zome, is a tradition that comes to us by way of Japan. It involves hammering flowers into fabric, which transfers the impression of the flower itself, color and shape alike. The same technique can also be applied to leaves of most kinds, except those that are waxy in texture. It’s simple to experiment with this technique—the supplies are easy to procure and are things you probably already have lying around. In addition, most people know how to hammer and own one in their basic at-home tool kit.

Supplies needed include a piece of fabric (I recommend natural fibers, such as linen or cotton), a hammer, and some plants! Plants of any kind will do, whether they’re from your backyard or a bouquet you’ve bought at the grocery store. Take a look at my foraging post to get some tips on how to find plants in your area. The best thing about flower pounding is you can use weeds or leaves of plants that grow in most neighborhoods.

If you’d like long-lasting color on your fabric, you can mordant with either aluminum acetate or soy milk.

Otherwise, you can start pounding right away!

Here is a short video on the method I use and some tips on how to get the best results. Note: I made this video during the lockdown of 2020, so it includes some language related to that. The advice to wash your hands always applies though!

It’s especially interesting to experiment and apply this technique to all different kinds of plants!

Here are some weeds that I’ve found around my neighborhood and pounded into fabric.

It’s fun seeing the different shapes and patterns that different leaves can create!

You can also use this technique with flowers. I’ve found that many flower petals work well and I especially love working with pansies. Below: a mix of pansies and microgreens.

This shows the versatility of the flower pounding technique and the variety of leaves and flowers you can use. Here is a picture of tansy flowers that I especially love.

Last but not least, I will show you the final step in the flower pounding process, which I outlined in my video above, but didn’t have the chance to show on camera.

This is the last step: peeling the original plant off of your fabric to reveal the print! In my opinion, this is the best part. You don’t have to wait for the piece to dry before you do this. Sometimes, though, it is easier to wait for the piece to dry and scrape the plant material off of your fabric with a credit card or other flat but durable object, as outlined in the longer instructional video at the top.

The fabric at the bottom of the picture above shows the original leaf, and the fabric below that is the print that’s left. You can either use two separate pieces of fabric when you’re pounding—the original fabric you want the print to lay on, and your piece of scrap fabric—or use one piece of fabric and fold it over itself each time you hammer a new plant onto it.

Happy flower pounding!!

I'm Inspired By You!

Sophie Kanter

A part of my work includes teaching workshops on natural dyeing. I love sharing my passion for indigo dyeing with others and seeing the work they create. No matter how many times I teach my Indigo Tie-Dye class, my students always come up with different and unique results!

In every class, students take my instruction on making various patterns on their cloth and take it to the next level! Often they come up with creative new ways of folding or binding the cloth, or they combine more than one method to come up with something totally unique.

The best thing about indigo dyeing is really no matter how you fold your cloth, it’s going to turn out beautiful, sometimes in totally unexpected ways. My students—and I!—are always surprised at the results. The reveal is the best part, and is often met with ‘ooo’s and appreciation from fellow indigo dyers.

I wanted to share with you some of the photos from over the years that have inspired me the most. Hope they bring you some inspiration as well!

Hope to dye with you soon!

Foraging for Dye Materials is Easier Than You Think

Sophie Kanter

There’s nothing more satisfying than harvesting materials for your own dye project. After all, plants are all around us! Whether you live near the woods or in the city, there are plenty of ways to gather plants you need for your next dyeing adventure.

The process of gathering dye plants from your area (or even neighborhood!) involves a few simple steps to get started. Similar to looking around your house for art supplies you need for a creative project, all it takes is a little know how and some urban or forest scouting.

Dye plants literally grow all around us, whether it’s in the middle of a forest, near a park, or even on the side of the road. The great thing about dye plants is that a lot of them are weeds, and in addition, a lot of weeds will yield color on fabric. So in that way it’s very easy to pick some plants and get started dyeing right away! You can use a plant ID app on your phone to identify plants you pick and then figure out if they make some sort of fantastic color.

In addition to downloading a plant ID app onto my phone, it’s been super helpful for me to keep an ongoing list of the plants that I find and where I’ve found them. I like to walk around the city a lot, and I keep an eye out for any dye plants that are accessible (aka not in someone’s garden or in a protected area), then note the place I found them—often with cross streets or some other specific information—in the notes app on my phone. That way I have my own list of places to find plants I can dye with, and can come back to those spots any time I need a fix of that particular color.

I would also highly suggest getting to know your dye plants by purchasing a few books. Here are two that are especially helpful to me, especially when it comes to foraging.

This is a little book on North American dye plants I found at a thrift store! It lists dye plants you can find in North America (obviously), along with black and white drawings of the plant, general information about the plant, and the colors you can yield from it on fabric with different applications. It’s small enough to carry around with you, almost like a pocket guide!

Another book I love is Harvesting Color by Rebecca Burgess. She is a wonderful dyer who works with wool, but the processes she describes in the book can be applied to any type of fabric.

What’s super helpful about this book is that it the featured plants are separated by season. There are beautiful photographs of the plant and the color(s) it makes on fabric and yarn. In addition, there are helpful maps with shaded in areas of where the plant can be found so you can tailor your search to the specific region you are in.

I love this book because it’s so well done and gorgeous, and it provides me with endless inspiration for my next dye project.

Okay—now to the fun part! You’ve read the books, no you’re ready to move on to the next step. In order to harvest your dye materials, you really need to get to know your area. Take walks around your neighborhood and keep a sharp eye out for any plants. If a plant catches your gaze because it looks interesting, or you’re just curious, whip out your phone and load up your plant ID app. If you already know what you’re looking for, it can be very exciting to see the plant in real life!

Here are some examples of dye plants I’ve found in my area.

These are cosmos and coreopsis flowers, two of my favorites! I found these growing in a sidewalk garden on a very busy street, and I took a few of them for myself. These flowers are perfect for dyeing because they can be made into a dye bath for all-over color, or printed onto the fabric to give the impression of the flower itself.

Introducing, pokeberry! This is a fun dye plant because it’s literally an invasive weed. The plant doesn’t really have any other use, so people will generally not care if you pick some for yourself (again, don’t go into someone’s garden!!). I found these along a walking path in my neighborhood. Since the plant is a weed, it literally grows like one, and in the late summer there are an abundance of these berries. There is a nice section in Harvesting Color that features this plant and the beautiful rich purple and pink colors you can achieve with the berries.

This is goldenrod, another of my all-time favorites. This flower is plentiful in late summer and early fall, and yields a gorgeous bright yellow color on fabric. I found this bundle growing next to a gas station! Yes, you read that right. I took plenty for myself because it was growing out of the sidewalk next to a place of business that clearly had no use for it.

Finally, a truly perfect foraging opportunity, with plants like osage orange (pictured above) or black walnuts. These are both fruiting bodies of trees that fall to the ground in very late summer/early fall. Once you have identified an area where there are either type of tree, you can easily harvest the dye plants from the ground with absolutely no harm done!

Now that we’ve covered resources, getting to know your plants, and figuring out places to find them, let’s talk about keeping track of what you find.

When you’re experimenting with dye plants, it’s really helpful to keep a dye journal. You can use a notebook (I am a notebook addict, so I always have extras lying around) and any scrap fabric you have—even old sheets will do. The most important thing is to make a small dye bath with your foraged plant, dye a small piece of fabric and record it in your journal.

This way it’s easy to keep track of the plants you’ve already experimented with and to keep a record of all your work. For me, it’s really fun looking back at my dye journal every once in a while to see all the work I’ve done. In my journal, I use a few different types of fabric (they all absorb the dye slightly differently) and what I did to achieve the color.

If you’d like to start foraging for your own dye materials, now you can get started! And if all this seems intimidating, start by just getting to know the plants around you. The more you walk around and observe, the more you will absorb and become curious.

Happy dyeing!